Desde siempre me han llamado la atención las marquesinas. Quizá por las veo muy habitualmente en el tren que viajo todos los días para ir de la casa al trabajo y del trabajo a casa, aunque ya desde mucho antes me gustaban.
NOTA
Puede ser interesante leer antes o después este otro post de Introducción a Comandos para saber qué son, dónde van y cómo funcionan.
INTRODUCCIÓN
Bueno, pues con esa idea en la cabeza se me ocurrió hacer un comando que en si mismo no tiene una utilidad claro, sino más bien abstracta o artística, pero que me viene muy bien para explicar el Objeto Timeline de JSFL.
El comando Escribir palabra no tiene una utilidad clara, es decir, no se creó con el fin de resolver un problema, sencillamente se hizo porque una tarde con una visión muy al estilo matrix (puede ser por la película o por una matriz) y con la nostalgia de las marquesinas de leds en la mente (quizá influenciado por las pantallas de los trenes de cercanías), si hizo.
TUTORIAL
Primero utilizaremos el objeto Document para acceder a su biblioteca (library), creamos y editamos un MovieClip en ella y por último acceder a su línea de tiempo (Timeline).
var oDoc;
var oLib;
var oTimeline;

this.oDoc = fl.getDocumentDOM();
this.oLib = this.oDoc.library;
this.oLib.addNewItem("movie clip", "Nombre_MovieClip");
this.oLib.editItem("Nombre_MovieClip");
this.oTimeline = this.oDoc.getTimeline();
Una vez que tenemos una referencia al objeto Timeline podremos utilizar sus métodos y propiedades, en este caso vamos a utilizar el método addNewLayer para agregar tantas capas como necesitemos.
this.oTimeline.addNewLayer();
Luego seleccionamos los fotogramas con los que vamos a trabajar, esto lo hacemos con el método setSelectedFrames y los convertimos en fotogramas clave:
this.oTimeline.setSelectedFrames(INICIO, FIN, REMPLAZAR_SELECCIÓN);
this.oTimeline.convertToKeyframes();
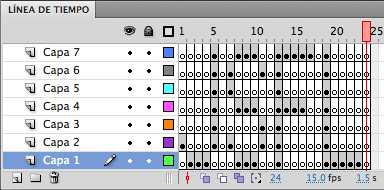
Y listo lo siguiente es simplemente ir creando algo en cada fotograma en función de un patrón para que la línea de tiempo tenga forma. Una forma sencilla de hacer esto es dibujando un círculo en el escenario, de esta manera el fotograma dejará de estar vacío, para dibujar el círculo utilizamos el método addNewOval del objeto Document:
this.oDoc.addNewOval({left:0, top:0, right:10, bottom:10});
El resultado al que queremos llegar es el que se muestra en la siguiente imagen.
Quizá sea mejor verlo desde lejos, porque muy cerca de la pantalla cuesta un poco leerlo.

El código completo es el siguiente:
var oDoc;
var oLib;
var oTimeline;
var aLetters;
var aWord;

this.config();

function config()
{
	fl.showIdleMessage(false);
	fl.outputPanel.clear();

	if(fl.getDocumentDOM())
	{
		this.oDoc = fl.getDocumentDOM();
		this.oLib = this.oDoc.library;

		this.init();
	}
	else
	{
		alert("Debes tener un documento abierto.");
	}
}

function init()
{
	this.configLetters();
	this.configWord();

	var nTotalLetters = this.aWord.length;
	for(var i = 0; i < nTotalLetters; i++)
	{
		this.createLetter(this.aWord[i], i * 6);
	}
}

function configLetters()
{
	this.aLetters = new Array();

	this.aLetters[" "] = "0,0,0,0,0|0,0,0,0,0|0,0,0,0,0|0,0,0,0,0|0,0,0,0,0|0,0,0,0,0|0,0,0,0,0";
	this.aLetters["A"] = "0,1,1,1,0|1,0,0,0,1|1,0,0,0,1|1,1,1,1,1|1,0,0,0,1|1,0,0,0,1|1,0,0,0,1";
	this.aLetters["B"] = "1,1,1,1,0|1,0,0,0,1|1,0,0,0,1|1,1,1,1,0|1,0,0,0,1|1,0,0,0,1|1,1,1,1,0";
	this.aLetters["C"] = "0,1,1,1,0|1,0,0,0,1|1,0,0,0,0|1,0,0,0,0|1,0,0,0,0|1,0,0,0,1|0,1,1,1,0";
	this.aLetters["D"] = "1,1,1,1,0|1,0,0,0,1|1,0,0,0,1|1,0,0,0,1|1,0,0,0,1|1,0,0,0,1|1,1,1,1,0";
	this.aLetters["E"] = "1,1,1,1,1|1,0,0,0,0|1,0,0,0,0|1,1,1,1,0|1,0,0,0,0|1,0,0,0,0|1,1,1,1,1";
	this.aLetters["F"] = "1,1,1,1,1|1,0,0,0,0|1,0,0,0,0|1,1,1,1,0|1,0,0,0,0|1,0,0,0,0|1,0,0,0,0";
	this.aLetters["G"] = "0,1,1,1,0|1,0,0,0,1|1,0,0,0,0|1,0,1,1,1|1,0,0,0,1|1,0,0,0,1|0,1,1,1,0";
	this.aLetters["H"] = "1,0,0,0,1|1,0,0,0,1|1,0,0,0,1|1,1,1,1,1|1,0,0,0,1|1,0,0,0,1|1,0,0,0,1";
	this.aLetters["I"] = "0,1,1,1,0|0,0,1,0,0|0,0,1,0,0|0,0,1,0,0|0,0,1,0,0|0,0,1,0,0|0,1,1,1,0";
	this.aLetters["J"] = "0,0,0,0,1|0,0,0,0,1|0,0,0,0,1|0,0,0,0,1|0,0,0,0,1|1,0,0,0,1|0,1,1,1,0";
	this.aLetters["K"] = "1,0,0,0,1|1,0,0,1,0|1,0,1,0,0|1,1,0,0,0|1,0,1,0,0|1,0,0,1,0|1,0,0,0,1";
	this.aLetters["L"] = "1,0,0,0,0|1,0,0,0,0|1,0,0,0,0|1,0,0,0,0|1,0,0,0,0|1,0,0,0,0|1,1,1,1,1";
	this.aLetters["M"] = "1,0,0,0,1|1,1,0,1,1|1,0,1,0,1|1,0,1,0,1|1,0,0,0,1|1,0,0,0,1|1,0,0,0,1";
	this.aLetters["N"] = "1,0,0,0,1|1,0,0,0,1|1,1,0,0,1|1,0,1,0,1|1,0,0,1,1|1,0,0,0,1|1,0,0,0,1";
	this.aLetters["O"] = "0,1,1,1,0|1,0,0,0,1|1,0,0,0,1|1,0,0,0,1|1,0,0,0,1|1,0,0,0,1|0,1,1,1,0";
	this.aLetters["P"] = "1,1,1,1,0|1,0,0,0,1|1,0,0,0,1|1,0,0,0,1|1,1,1,1,0|1,0,0,0,0|1,0,0,0,0";
	this.aLetters["Q"] = "0,1,1,1,0|1,0,0,0,1|1,0,0,0,1|1,0,0,0,1|1,0,0,0,1|1,0,0,1,1|0,1,1,1,1";
	this.aLetters["R"] = "1,1,1,1,0|1,0,0,0,1|1,0,0,0,1|1,0,0,0,1|1,1,1,1,0|1,0,0,1,0|1,0,0,0,1";
	this.aLetters["S"] = "0,1,1,1,0|1,0,0,0,1|1,0,0,0,0|0,1,1,1,0|0,0,0,0,1|1,0,0,0,1|0,1,1,1,0";
	this.aLetters["T"] = "1,1,1,1,1|0,0,1,0,0|0,0,1,0,0|0,0,1,0,0|0,0,1,0,0|0,0,1,0,0|0,0,1,0,0";
	this.aLetters["U"] = "1,0,0,0,1|1,0,0,0,1|1,0,0,0,1|1,0,0,0,1|1,0,0,0,1|1,0,0,0,1|0,1,1,1,0";
	this.aLetters["V"] = "1,0,0,0,1|1,0,0,0,1|1,0,0,0,1|1,0,0,0,1|0,1,0,1,0|0,1,0,1,0|0,0,1,0,0";
	this.aLetters["W"] = "1,0,0,0,1|1,0,0,0,1|1,0,0,0,1|1,0,1,0,1|1,0,1,0,1|1,1,0,1,1|1,0,0,0,1";
	this.aLetters["X"] = "1,0,0,0,1|1,0,0,0,1|0,1,0,1,0|0,0,1,0,0|0,1,0,1,0|1,0,0,0,1|1,0,0,0,1";
	this.aLetters["Y"] = "1,0,0,0,1|1,0,0,0,1|1,0,0,0,1|0,1,0,1,0|0,0,1,0,0|0,0,1,0,0|0,0,1,0,0";
	this.aLetters["Z"] = "1,1,1,1,1|0,0,0,0,1|0,0,0,1,0|0,0,1,0,0|0,1,0,0,0|1,0,0,0,0|1,1,1,1,1";
}

function configWord()
{
	sWord = prompt("Escribe una palabra.");

	this.aWord = new Array();
	var nWordLength = sWord.length;
	for(var i = 0; i < nWordLength; i++)
	{
		this.aWord.push(sWord.substring(i, i + 1));
	}

	this.createTimeline(sWord);
}

function createTimeline(_sWord)
{
	var sWordLengthInFrames = _sWord.length * 6;
	this.oLib.addNewItem("movie clip", _sWord);
	this.oLib.editItem(_sWord);
	this.oTimeline = this.oDoc.getTimeline();
	this.oTimeline.setSelectedFrames(0, sWordLengthInFrames, true);
	this.oTimeline.convertToKeyframes();
	for(var i = 0; i < 6; i++)
	{
		this.oTimeline.addNewLayer();
		this.oTimeline.setSelectedFrames(0, sWordLengthInFrames, true);
		this.oTimeline.convertToKeyframes();
	}
}

function createLetter(_sLetter, _nStartFrame)
{
	var sConfigLetter = this.aLetters[_sLetter];
	if(sConfigLetter)
	{
		var aConfigLetter = sConfigLetter.split("|");
		for(var i = 0; i < 7; i++) aConfigLetter[i] = aConfigLetter[i].split(",");

		for(var i = 0; i < 7; i++)
		{
			for(var j = 0; j < 5; j++)
			{
				if(aConfigLetter[i][j] == "1")
				{
					this.oTimeline.setSelectedLayers(i);
					this.oTimeline.setSelectedFrames(_nStartFrame + j, _nStartFrame + j + 1, true);
					this.oDoc.addNewOval({left:0, top:0, right:10, bottom:10});
				}
			}
		}
	}
	else
	{
		alert("No existe el caracter: " + _sLetter);
	}
}
DESCARGAS
Tenemos dos tipos de descargas, para instalar simplemente el comando y para descargar el JSFL:
Dudas, sugerencias o comentarios, aquí estaré.
Saludos.
2 replies on “Tutorial JSFL – Timeline”
Que interesante!
Tenía que haber descubierto esto antes de hacelo a mano, jejeje
http://www.flickr.com/photos/proknil/3304554299/
Buen curro,
Saludos!
Hola Sergio, gracias por tu comentario. Eso si es arte, vaya curro y que genial idea. Me ha gustado mucho la foto.
Saludos!!!